
Securing the Internet and your Computer
Monsoon's 2.1 PC Speakers Review
Acer 2200/2203LCi Laptop Review
Zalman Theatre 5.1 Headphone Review
Creative Zen Micro MP3 player Review
Samsung's CLP300 Colour Laser printer Review
Canon 8400F Photo Scanner Review
Canon Selphy CP510 Photo Printer Review
Windows Vista x86 and x64 versions should we upgrade?
SilverStone GD01MX HTPC Case Review
Corsair Survivor GT 8GB USB Flash Drive Review
Mio P550 Digiwalker
GPS PDA Review
Recode DVD's to H.264 with AAC 5.1
Guide to Install OS X 'Leopard' on a PC
Guide to install OS X 'Snow Leopard' PC
AVerTV Hybrid Volar MAX Review
How to install the 'Leopard' Mac OSX (10.5) on almost any Intel based PC or Laptop to create a Hackintosh!
Some of you may be asking why anyone would bother trying to acomplish this when they could just buy a Mac to run OS X, Well a couple of reasons the first reason relates to the fact that not everyone can or wants to purchase a Mac, second reason relates to trying OS without investing in any hardware. The third reason is related to the challenge of getting the Mac OS running on machines not designed or approved to run the OS. I have always wished someone would give Microsoft some competition and the Mac OS, if ever released to run on general PC hardware could challenge Microsoft for the desktop. The two most likely reasons we would never see it happen, PC hardware manufacturers have so many different combinations of CPU's, chipset's and devices in their machines that Apple would have a hard time trying to make the OS work with all the possible hardware out in the wild. The second more plausible reason is that if Apple released the OS to the masses what compelling reason would anyone have to purchase Apple hardware?
Update: (Nov 6 2009)
Snow Leopard has arrived (OS X 10.6) and the new release brings many fixes and code optimizations resulting in a faster more stable release, the new release means the installation guide must be updated so have a look at the guide for 'Snow leopard' by clicking Here.
If anyone missed it Apple ditched the old Power PC CPU's and migrated to Intel CPU's, in fact much of the Apple hardware listed is available in many generic PC/Laptop configurations so to ensure the OS would remain a Apple only OS they went with EFI (Extensible Firmware Interface) instead of the BIOS (Basic Input/Output System), then they added a module called a TPM (Trusted Platform Module) its function, for now, seems to be to simply to avoid the possibility that Mac OS X could run on non-Apple computers. If you remove TPM issue and create an EFI workaround then the OS will install on any system, obviously these problems have been overcome or this article would not be possible. Heck if you want you can even order a PC with OS X installed from Psystar or if you want try another option have a look at the EFI-X module that will allow you to install OS X without bypassing EFI or the TPM.
Before you attempt this you should understand that it may not be easy unless you happen to have the exact hardware that an existing Mac uses as Apple only writes drivers for hardware they use. To ensure a success you should try and match your hardware as closely as possible to what Apple has used in any of their various systems. Hardware compatibility lists do exist but keeping them up to date is next to impossible as new hardware and revisions are always being released.
The best compatibility seems to be with Intel CPU's Using Intel Chipset's, Not that AMD CPU's won't work they will but they require a Disk designed with them in mind and they are not recommended for OS X because of stability issues. Some Intel CPU's also have issues so I suggest you try and use an Intel 'Core Duo' or Intel 'Core 2 Duo' based machine as others will not be nearly as stable and reliable. You also require a DVD Drive to perform the install and most video cards should work in VESA compatible mode but you may not have accelerated graphics. Other devices may not be recognized so you may not have internet access right-away. Lastly anyone who is planning on having a dual-boot system with Windows and the Mac OS should read the Dual-Boot section below to prepare correctly, click Here to jump to the Dual-Boot section
I suggest you record all the make/model numbers of your hardware as this will make your life easier when trying to select and install drivers. If possible in Windows XP or Vista open the 'Control Panel' then open the 'System' panel from here select the 'Hardware' tab then select 'Device Manager' now you need to select each piece of hardware then right-click and go to it's 'Properties' from this window select the 'Details' tab and you will see a long string like the one below, record the whole string as you may need this information.
PCI\VEN_8086&DEV_4229&SUBSYS_11008086&REV_61\4&23F5EDAD&0&00E0
The string above is for the Intel Wireless 4965AGN Mini-PCI network card
I have successfully installed Mac OS X on several Desktop PC's and two Sony laptops I have also had some failed attempts at getting these systems to install correctly and I will cover the specifics a bit later. The first step is to decide which install disk to download, I have had good success with the 'iAtkos 4.1i' but others will suggest 'iDeneb' or 'Leo4all' the problem is that while one will work for them it may not install for another person and you may have to install a few times with different options before you have a working install (obviously a torrent site such as the Pirate bay is a good place to start your search).
Update: (Nov 6 2009)
A new method has been created called 'Boot123' that will allow users to install OS X from a original retail DVD (retail meaning copy sold in stores/online from Apple) the big advantage using this method is the ability to receive system updates directly from apple as the install is 'Vanilla' (Vanilla meaning a unmodified version of the install process) it also means not having to hunt/download one of the many 'hacked' installer DVD's mentioned above!
Be patient as you may have to install or try various versions before you have your very own 'Hackintosh'. I also strongly suggest to use the MD5 information of the release to verify you have an exact unchanged copy of what was released as using a modified or corrupt .iso will only make your install experience a complete nightmare, you can download a Free MD5 checker from www.fastsum.com
Obviously purchasing a copy of Mac OS X is required to legally run the OS, currently the license agreement only allows installing on 'Apple Hardware' but this is being brought before the courts as unfair so until the dust settles you may be breaking the license agreement. The good news is that Apple doesn't seem to be going after individuals who are attempting this so you should be fine.
As mentioned above I used iAtkos 4i for most of my installs and I will be covering the install using that specific install package but rest assured the others are fairly similar. I managed to install Mac OS X on two Sony Vaio laptops a VGN-CR240D and a VGN-CR510D and both had an issue getting the Video working, but I found a workaround and will talk more about the issue further down. If you wish to have the ability to Dual-boot with Windows XP or Vista it can be done quite easily but I suggest you only attempt this after you have successfully installed Mac OS X and are happy with the configuration. Obviously you need to be willing to sacrifice the data on your Hard drive because you will need to create new partitions or format to complete the install.
Let's begin...
Update: (Nov 6 2009)
If you wish to try the new 'Boot123' method mentioned above you'll need the Boot123.iso which can be found in this forum Here. Burn the .iso and boot from it first then swap it out for the 'Leopard' install disk and follow the balance of the instructions located below. The major difference is that you must use a GUID partition table which makes dual booting with another OS harder and a bootloader will need to be installed you'll need the Chameleon installer so grab it from Here.
So after you have downloaded and confirmed the MD5 of the install disk you will need to burn the .iso file, I suggest you use some good media and burn at 2X or 4X to ensure good readability and if available use the 'verify' disk option.
The last step before you try and install is to enter your PC's 'bios' it should be the [Delete] key but on some systems it can be one of the [F1] to [F12] keys. Once you access the Bios you will need to browse through the menus and check if you have the following options, if you do set them as indicated:
Boot Order = DVD/CD
SATA = ACHI
ACPI = 1.0
Save your changes and exit the bios.
Insert the Mac OS X install disk into your DVD drive and restart the PC if everything worked you'll see a message asking you to hit any key to boot the install or press [F8] to enter any options, hit [F8] and at the command prompt enter '-v' (without the quotes) this will enable 'verbose' mode so if the system stops we can figure out where it stopped, if using other cpu's than the recommended ones mentioned earlier then you may need to use these commands at boot:
AMD = '-v cpus=1'
Pentium 4 with HT (Hyper Threading) = '-v cpus=1'
Install screen
Great you managed to reach the install screen, click that [OK] button and wait for the next screen to load, we need to partition and format the disk before we can start the actual installation so click the top bar where it says 'Utilities' and from the drop down select 'Disk utility'. Once the Disk utility loads select the 'Partition' you wish to use or change. If you plan on changing the existing partitions you can do this here but make sure you apply any changes. Most users you will simply want to use the 'Erase' option to format the hard drive, when formatting make sure you select 'Mac OS Journaled' and give the volume a name (I suggest 'leopard') just don't use any non-standard characters or spaces in the name or you'll have problems accessing your drive if you have to use the command prompt. Hit 'Erase' and when complete simply exit the application, you will be returned to the set-up screen, hit [OK] and agree to the license to continue.
If you partitioned and formatted correctly you should see that drive available to install OS X, select the drive and hit [OK], on the next screen select the [Customize] button so that we can select our install options. depending on which install disk you are using you may have different options then the ones I will be listing below but these are needed for most systems, remember don't select drivers yet as they can be added at any time by repeating the install and only selecting the drivers you wish to load. If you see the 'waiting for root device' error on reboot then try the SATA driver that is closest to your hardware and try again.
EFI Bootloader = EFI+Chamelon
SMBIOS = Netkas (fix for 'about this mac' crashing)
Speedstep = New (required for Laptops's)
You may see many more options than those I listed but for a first install only these should be used, if you have issues you can try different kernals or drivers but I suggest you make notes of which options you have selected and change as few as possible to help you determine which settings work. You can now proceed with the install, if this is the first install let the system check the DVD before it proceeds, if this has been done on a previous install feel free to hit the [Skip] button.
The install will take about 20 minutes, move the mouse once and a while or the progress bar will not display the current progress correctly until you do. Once the install is complete you will see a window stating the install was successful and the system will reboot in 30 seconds. if you miss the message and the system just reboots don't panic it probably finished the install and you missed the message.
And the verdict is... Further Reading |
 |
Here is my desktop and some of the installed applications
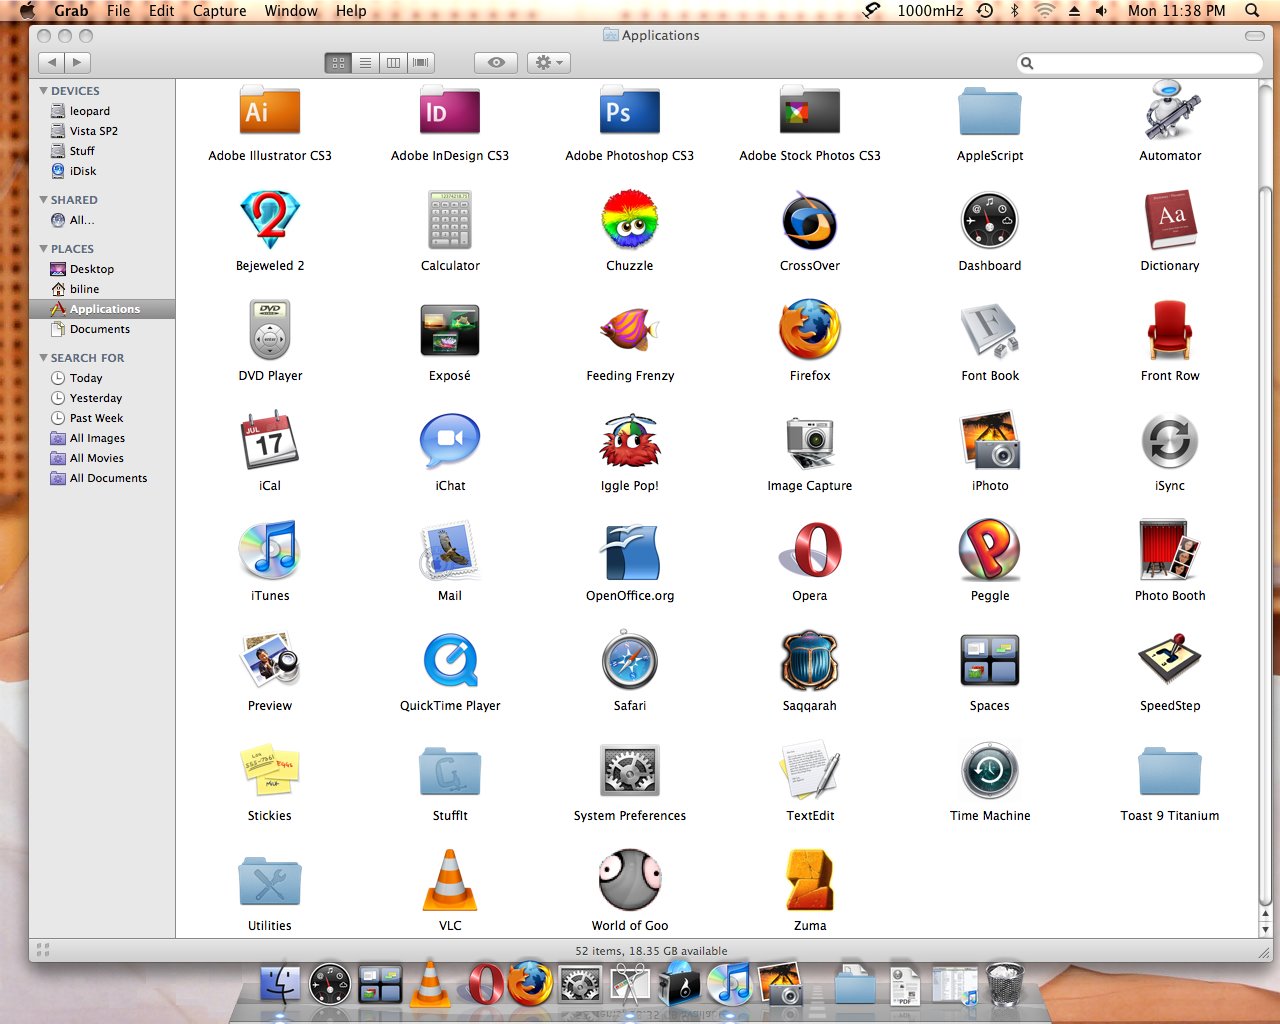
Click photo to enlarge to it's full size of 1280x1024
A Warning about Updates
Most updates to programs will install without causing any issues, for example updates to Quicktime are fine, but do NOT install any system updates that will update the kernal, for example if running 10.5.4 don't try and update to 10.5.5 or 10.5.6 these type of updates require some preparation and will usually result in an error or a locked system. If you feel the need to update check the Insanely Mac forums for advice on how to perform the update and look for problems others may have encountered before trying a specific update
Programs that are a must for your new 'Hackintosh' and all of them are FREE!
- OSX86 Tools
Running simple maintenance tasks to installingbootloaders, OSX86 Tools is the ideal companion for any Mac OSx86 user(Mac OS X on PCs). Put an end to the endless stream of Terminal commands, and be welcomed into a simple, easy to use GUI that will make you, become an OSx86 power user. Easily install kernels,kexts (kernel extensions), backup important files, run computer maintenance, modify OS X cosmetics, boost graphics performance by up to50%, install hardware drivers in 1 click and more with OSx86 Tools.
- Opera Browser
Integrated mail client, bit-Torrent support, tabbed browsing and many more innovative features to numerous to mention I highly recommend this browser
- Firefox Browser with the awesome Fire FTP plugin
You know the browser so no point mentioning all the features with exception of the great Fire FTP plugin that allows dual panel FTP access with a simple click and point interface.
- Perian or VLC Player
Perian is a free, open source QuickTime component that adds native support for many popular video formats. VLC Player is also a great little player that will open almost any format you can throw at it highly recommended.
- Open Office for Mac
OpenOffice.org (OO.o or OOo) is an office application suite available for a number of different computer operating systems. It supports the OpenDocument standard for data interchange as its default file format, as well as Microsoft Office '97-2003 formats - among many others.
- iStat
iStat pro is a highly configurable widget that lets you monitor every aspect of your Mac, including CPU, memory, disks, network, battery, temperatures, fans, load & uptime and processes. iStat pro can do it all and iStat menus offers the same but on your taskbar!
These are are just a few programs you can grab many more can be found in these places:
Dual Boot
How you approach Dual-boot depends a lot on the order you have installed your operating systems the easiest method involves partitioning your hard-drive into two primary partitons and installing Windows XP or Vista first then installing Mac OSX on the second partition.
Windows XP and Mac OS Dual-Boot procedure
With Windows XP installed and a successful install of Mac OSX you'll notice that you won't have access to Windows XP. To correct the problem we need to tell the PC that the Windows partition is the boot drive the easiest way to do this is to download the Gparted Live CD Here once downloaded burn the iso and boot the disk to get into the Gparted environment. Find your Windows XP partition it should be listed as 'ntfs' or 'fat 32' if you see 'hfs+' that will be the OS X. Select the drive by clicking on it once and then right click look for the 'Manage flags' options and select it, a new window will open, the first item is called 'Boot' and the box should be empty so click the box to enable this flag now click the [Close] button and it will apply the changes. Check the 'Flag' section near the end of the window and you should see the word 'Boot' marked on the Windows XP partition, if everything is fine then exit the Gparted CD and reboot. You should now be back into Windows XP. Now download the file called 'chain0' Here and unrar the file (if needed download winrar Here) to the root of your Windows XP drive (should be C:) Now we need to edit a file called 'boot.ini' which may not be visible of the root of your drive because by default Windows hides system files.
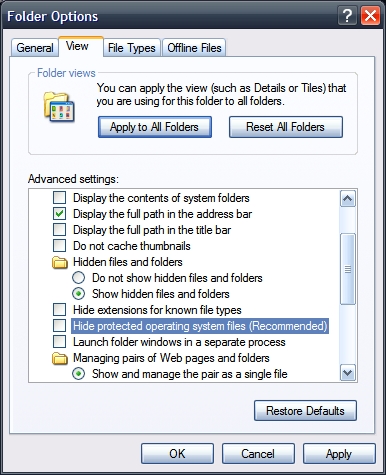
To enable viewing of system files open 'My computer' select the 'Tools' menu and then choose 'Folder Options' a window will open select the Tab called 'View' and scroll down until you see a line called 'Hide protected operating system files' and uncheck the box, a warning window will open verifying you wish to enable this feature so click [Yes] and then click the [Apply] button to save these settings. Browse to the root of your drive and you should see the file 'boot.ini' select it by clicking it once now right click and choose the 'Edit' option, the file will open in notepad for editing. you should see a few lines ignore the contents you simply want to add a new line to the end of whatever is in the file, which is:
Save the File and reboot you should have a new option to boot 'Windows XP or 'Mac OS X86' when OS X is selected the 'chain0' file will locate the Mac HFS+ partition and will proceed to boot from it, assuming editing was done correctly and the file is found. |
 |
Vista and Mac OS Dual-Boot procedure
Note: you will need an original install DVD of Vista to fix the install, restore disks provided with some systems will not work it must be the original Vista installation DVD.
With Vista or (Windows 7) installed and a successful install of Mac OS X you'll notice that you won't have access to them. To correct the problem we need to tell the PC that the Windows partition is the boot drive the easiest way to do this is to download the Gparted Live CD Here once downloaded burn the iso and boot the disk to get into the Gparted environment. Find your Windows partition it should be listed as 'ntfs' if you see 'hfs+' that will be OS X. Select the drive by clicking on it once and then right click look for the 'Manage flags' options and select it, a new window will open, the first item is called 'Boot' and the box should be empty so click the box to enable this flag now click the [Close] button and it will apply the changes. Check the 'Flag' section near the end of the window and you should see the word 'Boot' marked on the Windows partition, if everything is fine then exit the Gparted CD. If you try and load Vista now it will fail with an error so it's time to insert your Vista installation DVD and reboot. When the install screen gives the option to 'repair a current install' select this option, you may need to select the drive where the Vista is located, allow the disk to fix the error, it should take under a minute. You should now be able to boot into your Vista install with no issues!
Now we need to download a program called EasyBCD from Here and install it.
- Fire-up EasyBCD, and navigate to the "Add/Remove Entries" screen.
- Select "Mac OS X" from the tabs at the top.
- From the platform drop-down list, select "Generic x86 Hardware"
- If you wish to change the name from the default "NST Mac OS X," you may do so now.
- Select "Auto-configure Mac Settings" and then hit "Add Entry" to finish up.
You can now reboot your PC, and select "NST Mac OS X" (or whatever you chose to call it) from the Vista bootloader. OS X should begin to boot immediately, now hit any key to get start-up options Note: you have only a few seconds when the message shows to hit a key or the system will send you into the OS selection menu again. If you hit a key in time you should see a list of Drives to boot simply choose the second partition where the Mac OSX is installed (called leopard if you named it the same as this guide) and press enter and you should soon see the Mac OSX desktop.
Known Hardware issues:
Remember OS X only provides drivers for hardware found in the normal line-up of Mac's so if yours is not the same hardware don't expect much help as third party drivers are scare.
- Many audio chipset's are not fully supported so you may have no sound or sound that works through headphones only or when plugging in headphones the internal speakers won't turn off!
Some work has been done on the Audio chipset's and you may find some drivers that partially work but many are not 100% fully working as the microphone input and headphone output are often problematic
- Wireless cards may not work correctly
The best fix for laptop users with Wireless that won't work is to replace the mini-PCI card with a Broadcom BCM94311 Mini-PCI Wireless card they are often listed as 'DW1390' because that is the part number Dell uses and they can be found for around $20 on e-Bay I changed both of my laptops over to this card and had no issues, but be warned unless your laptop provides an access port for the Mini-PCI slot you may have to remove the entire rear cover to access it. The Sony VGN-CR240D was a pain as I had to remove the entire rear cover to access it but the Sony VGN-CR510D was much easier as I only had to remove two screws in the battery compartment to remove the keyboard which gave me easy access to it's Mini-PCI slot.
- Network cards may not work correctly
Some progress has been made with the more common network chips but those that work are usually already included on the install disk
- Memory card readers may not work correctly
Not much progress with internal readers but most external USB readers work fine
The best place to check into your specific hardware is the Insanely Mac forums but you may have quite a lot of reading to wade through to find a solution that works for you and this is where the PCI Device string I suggested you collect earlier becomes very important.
Last Words
I have tried to make this guide as easy as possible to follow as many other guides assume the user has a higher level of knowledge then users may actually have, some of you may roll your eyes at the level of detail included but I hope the guide enables any user to perform, or at least attempt an install.
Of course much of this guide is from my experience with installing Mac OSX but I would not have been able to complete my install with out the help from all the dedicated users over at Insanely Mac so a big thanks to all of them.