
What's so special about the X-Box?
X-Box FAQ Frequently Asked Questions
Flashing the TSOP of your Xbox Tutorial
X-Box UXE Softmod Installation tutorial
Flash the Firmware of your Xbox 360
![]() Adapter Method using the Xecuter Connectivity Kit
Adapter Method using the Xecuter Connectivity Kit
 |
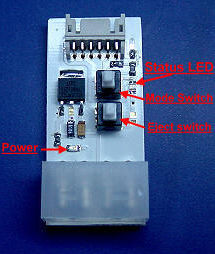
The Adapter Method currently involves using the Xecuter Connectivity Kit another type may work and other competing kits may also be available but we are talking specifically about the Xecuter Connectivity Kit: which should look like the photo on the left. it consists of two adapters one for reading the Xbox Hard drive without the need for removal or any other wires and the second adapter is designed to allow hooking up the Xbox 360 DVD-drive without any wires from the Xbox 360 and has a tray eject switch and the all important switch that allows the drive to enter 'Mode B'. If you wish to purchase one head over to www.teamxecuter.com to get an approved vender list. |
If you're using the Xecuter kit, nothing should be plugged into your Xbox 360, only the
DVD-drive you removed from the Xbox 360.
I'll assume your Xbox 360 is apart if not better follow these instructions Here
- Turn your PC off
- Plug the DVD-drive into the adaptor kit, the power should be from the xecuter kit and the SATA cable from your SATA controller should also be connected directly to the DVD-drive
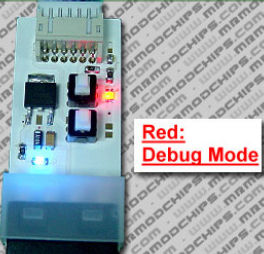
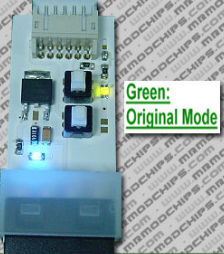
- Make sure the 'Mode switch' is down and 'Eject switch' is up (see photos below)
- Turn the PC on you should see a red light on the adaptor (see photos below)
- Boot into Windows
- Check Explorer to see if the drive has been assigned a drive letter as Windows XP sometimes will detect the drive and it will appear in device manager, but no drive letter will be assigned, if this is the case then you need to get windows to assign a drive letter.
To assign one do the following steps:- device manager >
- DVD/CDROM drives >
- Right click on HL-DT-ST DVD-ROM GDR3120L SCSI CdRom Device >
- Properties >
- Volumes tab >
- Populate >
- OK
You should leave the 'Mode switch' down (red LED on adaptor). It does no harm to
the drive and unlike the Cross wires method you do not need to press it quickly or anything as it automatically does the proper procedure for you.
Jump to the instructions for your specific DVD-drive
- Instructions for Hitachi-LG drives Click Here
- Instructions for Toshiba-Samsung drives Click Here
- Instructions for Phillips drives Click Here
Instructions for Hitachi-LG drives
For Hitachi-LG drives simply run the 'Xtreme.bat' batch file from a DOS command prompt in windows specifying the DVD-drive letter to flash eg 'xtreme.bat g' The batch file will run and will pause after each step, just press any key to continue until it reports success. Power off the PC and Now turn the power off to the Xbox 360 reconnect the cables as they were and assemble the Xbox 360.
Instructions for Toshiba-Samsung drives
If using the Toshiba-Samsung drive the steps are not automated and need to followed exactly as presented below.
- Creating a Bootable Floppy
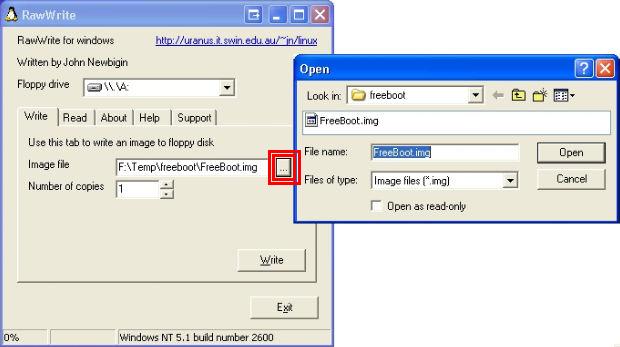
Create the FreeDOS boot floppy start by unzipping the file you downloaded earlier (Click here to get file) you should see three files 'diskio.dll', 'FreeBoot.img' and 'rawwritewin.exe' launch the 'rawwritewin.exe' file and you'll see a screen that looks like the one below. Click the button with '...' (see red box) and open the 'FreeBoot.img' file once it's loaded insert a floppy into your floppy drive and hit the 'Write' button to create the floppy.
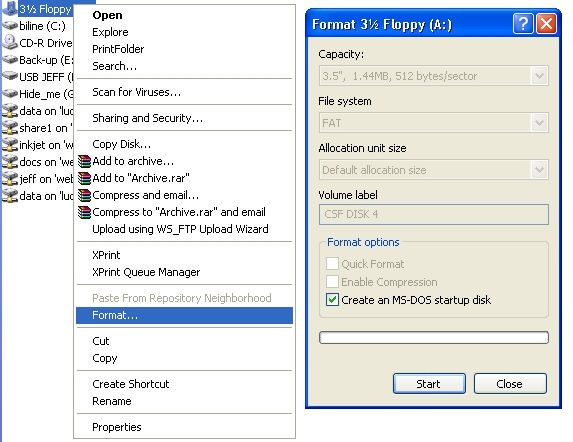
If you wish to create a MS-Dos Floppy instead then insert a floppy in your A: drive. Right Click
on the A: drive in My Computer. Select 'Format' then tick 'Create an MS-DOS
startup disk' hit start and allow the program to finish formatting the disk.
Regardless of which floppy you make you need to copy these files to the floppy:
- MTKFLASH.EXE Note: If you have an Nforce4 chipset, use the version found in MTK-NF4.rar
- MTKFLASH.TYP
- XTREME.BIN
- XTRM0800.BIN
- Backing Up Your Firmware:
Make sure your Xbox 360 is on and the DVD-drive is in 'Mode B' now boot your PC with your bootable floppy. Make a backup of your DVD drive firmware by typing this command
'mtkflash r /m orig.bin'
Now you have the choice to select SEC Master or SEC Slave: select Master. The
application should start reading the flash. After it’s finished it will tell you to reboot
the system. Remove the floppy and boot into Windows. Open the floppy from My Computer
and select the file 'ORIG.BIN'. This is your Xbox 360 DVD-Drives firmware, Important back this file up don't loose it!
- Getting Your Key:
Download Hexworkshop (Click Here) and install it on your PC
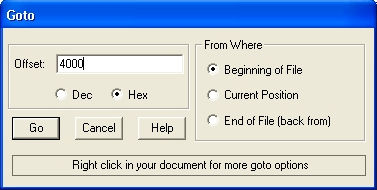
Open the Hexworkshop program, once running select 'open' and browse to the file you created in the previous step called ORIG.BIN once it's open you need to access the 'Goto' function, select the 'Edit' tab then select 'Goto...' a new window will open you need to select the 'hex' button now set the offset to 4000 (if the display shows '00000' try again) and lastly in the box 'From Where' select 'Beginning of File'
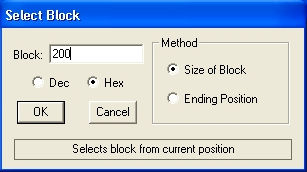
Now select the 'Edit' tab then you want 'Select Block' another window will open select 'hex' and set the Block: to 200 (if the display shows '00000' try again) the box 'Method' should be set to 'Size of Block' press the 'OK" button
You should notice a rather large area is now highlighted, select the 'Edit' tab then select
'Copy'. this places the information into the clipboard ready to be pasted into the 'xtreme.bin' firmware.
Modify the xtreme.bin firmware with your key
Select 'open' and browse to the file 'xtreme.bin' once it's open you need to access the 'Goto' function, select the 'Edit' tab then select 'Goto...' a new window will open you need to select the 'hex' button now set the offset to 4000 (if the display shows '00000' try again) and lastly in the box 'From Where' select 'Beginning of File'
Now select the 'Edit' tab then you want 'Select Block' another window will open select “hex” and set the Block: to 200 (if the display shows '00000' try again) the box 'Method' should be set to 'Size of Block' press the 'OK" button you'll see a large highlighted area full of 'FFFF'
Select the 'Edit' tab then select 'Paste' your original key should be visable where the 'FFFF' were previously and the section will be using all red letters.
Last step save the modified 'xtreme.bin' to a new file by selecting the 'File' tab then 'Save as...'
a new window will open change the save name to 'modified.bin' and click the 'Save' button. Make sure you put a copy of the 'modified.bin' onto the boot floppy before proceeding to the next step.
- Flashing the modified firmware to your DVD-drive:
Make sure your Xbox 360 is on and the DVD-drive is in 'Mode B' now boot your PC with your bootable floppy. Flash the firmware of your DVD drive by typing this command
mtkflash w /m modified.bin
If you did everything all right your Xbox 360 will now read all correctly made back-ups.
- You should reasseble the Xbox 360 and test it with an original and a back-up disk
Instructions for Phillips drives
Not available yet.....
Bad Flash Recovery
If for some reason your flash failed or you lost power or something unforseen happens you can try this solution.
You'll need your Bootable Floppy with MTKFLASH.EXE and your original firmware 'original.bin'.
Attach the bad DVD drive to SATA 1 on your motherboard.
Boot from Floppy and get to a Dos prompt then type this command
'MTKFLASH W /SATA /M original.bin'
You should get a response from the system with a list of possible sata ports to flash to.
Turn off the power to the DVD drive wait a second and turn it back on again.
Now hit 1 on the keyboard (SATA 1) to start the flash.
It should start flashing or it will display waiting at 'Port: d800, Master/Slave: a0'
If it waits for more than a few seconds hit escape twice to stop the attempt and power
off the drive again, keep trying the last part again. It should work after a few attempts.
Verify the DVD-drive works and you can attempt to flash it once more with the modified firmware.