
What's so special about the X-Box?
X-Box FAQ Frequently Asked Questions
Flashing the TSOP of your Xbox Tutorial
X-Box UXE Softmod Installation tutorial
Flash the Firmware of your Xbox 360
USB Flash Memory Stick support on XBox
You have two possible ways to achieve the goal of using a USB Flash memory stick on your Xbox but before we even continue please check to see if the particular Flash drive you have is compatible with the Xbox by checking the compatibility chart Here or you can Jump to devices that refuse to work Here
Step One: The easy way
The easiest way to get your USB device on the XBox is to make your own cable as described below. but if you don't wish to destroy a controller then you can add the USB connector directly to your joystick by following the instructions a little further down
| Start by separating your cable at the break-away point just like this photo, now cut off the Regular Xbox connector anywhere after the point shown in the photo. | 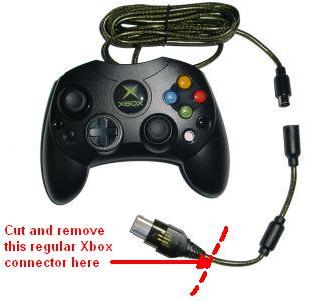 |
Cut off the wire shielding and separate the wires you should now see this. | 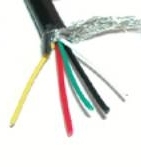 |
Step Two: The hard Way
Adding the USB female connector to your Xbox controller
Unscrew your Xbox Controller and locate the main PC board inside, be careful to make sure you don't damage any wires. Note be careful to avoid any buttons falling out as it can take a while to put everything back together correctly.
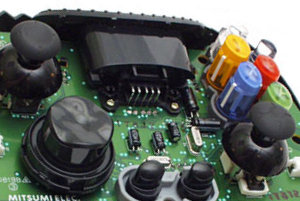 |
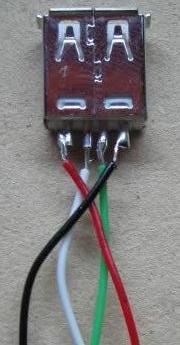
The area where the usual XBox memory cards are inserted is where we will be adding the USB female connector You will notice that one side is larger than the other. With the diagram below you will be able to figure out which wires go where |
| So when you are looking at the top of the Xbox controllers PC board (the area from the photo of the open Xbox controller) you will need to add the wires to the pins shown in the diagram on the right as the memory port is upside down. Solder your points carefully and once done cut a hole large enough for the soldered connector to fit through to allow access to it from outside of the controller once it's re-assembled. Connect your USB memory stick into the Xbox controller and try to access it, a message will appear if compatible saying the memory card could not be read and was erased. If it's not compatible the message will be that the memory card is damaged and does not work. |  |
Software you will require:
So the memory stick was formatted for use with the Xbox but it will not work with Action Replay software until you edit the configuration file. Start the USBView program and find your device from the list, click on your device and save the information it will look like the example below:
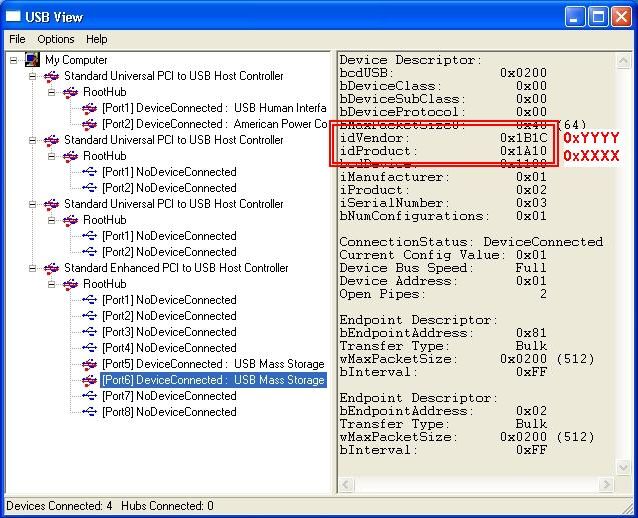
- idVendor: 0xYYYY
- idProduct: 0xXXXX
Record the YYYY digits and the XXXX digits and browse to where you installed the Action Replay software by default it installs in C:/Program Files/Datel/Action Replay Xbox/Drivers look for a file called 'xbreader' you need to open this file with notepad (or your fav editor) and find the [_Devices] section.

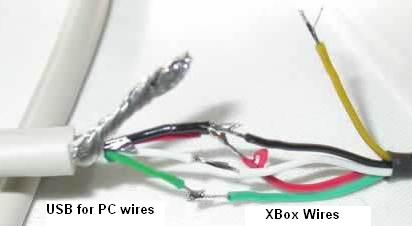
As indicated by the above photo you need to change the entry VID_0781 to the YYYY digits you recorded from the USBView program and change the &PID_5204 to the XXXX digits, now save the file and exit notepad.
Open your Control Panel and switch to 'Classic Mode' this will allow you to find the System icon. Open the System control and once it's open click the ' Hardware' tab, now click on the button labeled 'Device Manager'. Locate the section called 'Universal Serial Bus Controllers' click on the '+' in front to expand the section. Locate the 'USB Mass Storage Device' (If you see more than one make sure you have removed all other USB devices) now select the 'USB Mass Storage Device' right click and you will see a menu appear you want to click on 'Update Driver..'
A new window appears select the option 'Install from a list or specific location (Advanced)' click 'Next' to get the next screen. Select the option 'Don't Search. I will choose the driver the install'. Click 'Next' Select 'ActionReplay XBOX' and click 'Next' (you might have to click 'Have Disk' and browse to the directory where you installed the Action Replay software) everything is complete and your USB device should be functioning properly.
Step Three: Prepare your Bios using the steps outlined below
Using XBtool
- If you have a V1.0/1.1 XBOX Console you need a 1 MB (1024 KB) BIOS.
- If you have a V1.2/1.3/1.4/1.5 XBOX Console you need a 256 KB BIOS.
The BIOS I highly recommend is X-ecuter 2 4981 BIOS. (4981.06_256k.bin). I am going use the X-Ecuter 2 4981 BIOS for this example because it is the BEST BIOS and is MULTI which works for ALL VERSIONS of XBOX.
Once you have obtained the X-Ecuter 2 4981 BIOS (It’s 256 KB when you download it, don’t worry just follow along) open up XBTOOL. Here is a picture of XBTOOL, I will explain what everything is and what to do.
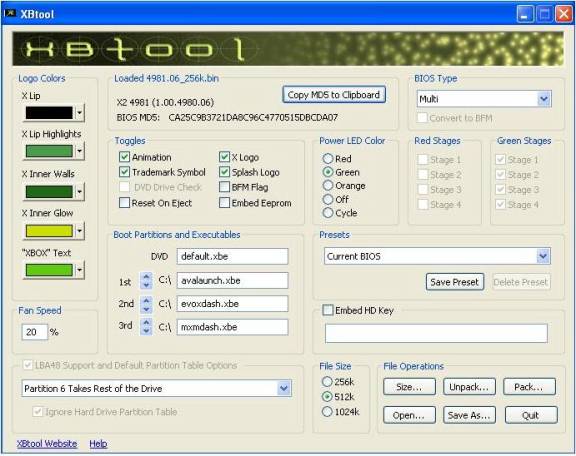
Click 'Open' Then locate your 4981.06_256k.bin.
LOGO COLORS: These are the colors you get on the opening splash screen. Look at the photos below as an example.
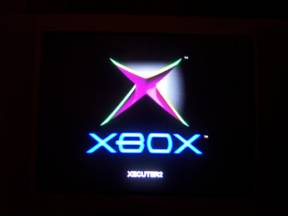

One is the real Microsoft Dashboard. Can you tell the difference?
LOADED BIOS: (Located right beside logo colors) this is just simply what BIOS you have loaded into XBTOOL being X-Ecuter 2 4981 in this case.
BIOS TYPE: This just means what versions this BIOS is compatible on. In this case all XBOX Versions, being MULTI.
TOGGLES: Just the stuff that goes on when booting the XBOX. I would just leave these how is.
POWER LED COLOR: Which color you want your Power / Eject button to be when this BIOS is loaded. You can choose any color, the Stages beside it just ignore, it goes with which color you choose.
FAN SPEED: What speed your fan goes at. Just put it anywhere between 20% and 25%
BOOT PARTITIONS AND EXECUTABLES: Leave DVD how is, this is just what the BIOS will look for to boot 1 st. Example is when you just flashed and boot your XBOX with the BIOS, it will load the Microsoft Dashboard. But after say when you put Avalaunch or Evolution-X on it, it will load that BEFORE the Microsoft Dashboard. Pretty simple stuff. Change that to your convenience.
PRESETS: Ignore this.
EMBED HD KEY: Leave it unchecked and ignore it.
LBA SUPPORT: Ignore it, we don’t need it.
FILE SIZE: OK, once you have configured your BIOS on how you like it, choose your correct file size. If you have an Xbox Version 1.0 or 1.1 check the 1024 KB BIOS. If you have an Xbox Version 1.2/1.3/1.4/1.5, then check 256 KB BIOS. Then click Save as, and save it as bios.bin
Now once that’s done, put your bios.bin in the proper 007 AUF game save directory. Technically it needs to be placed into 2 different places the first bios.bin should be placed into the "bios" directory which is located under the "4541000d\000000000000\" directory. a .txt file should be here that says "bios goes in here for evox flash.txt" the second copy goes where the .txt file "bios.bin for eurasia goes here.txt" is located.
Now, once that is complete, connect your XBOX to your network and using FlashFXP (any FTP client will work), copy the entire save game to the Xbox, note that the files must go under the E:\UDATA folder, your save game must use a folder under the UDATA folder and it will be called 4541000d. Send everything to this folder, once completed you should see E:\UDATA\4541000d on your XBOX, then the 000000000000 folder with 3 files TitleMeta.xbx,TitleImage.xbx and SaveImage.xbx, of course under the "000000000000" directory is the "bios" directory which contains the bios you will be using.
Step Four: How to get the save game onto our Memory card!
Now download the Action Replay software Here after installing it insert your Memory card into either Memory card slot on the controller and Windows should see it and install the correct driver. Fire up the action replay software and confirm that the large 'AR' has turned green if it has your ready to zip your save game (if not check all wiring and try to reload drivers also check that the memory card is seated properly and remember if using a Non-Microsoft Memory card it may not be seen). Use winzip or Winrar remember to zip the file from the Udata folder and include its directory contents below the Udata folder. Once you have your .zip simply drag the file from the File Explorer window onto the left most pane (which is the contents of the Memory card).
Note in the photo above the large 'AR' is black, it will turn green once a Memory card is inserted and recognized by the Action Replay driver. The bar on the Memory Card will turn orange and increase in length until the complete file has been written to the Memory card. The Memory Card screen will be updated with the save games installed on the Memory card. Now you're ready to copy the save game to your Xbox.
Copy the save game to the unmodded XBOX that you are about to flash. Make sure you have copied it the hard-drive and do not try loading the save game from the memory card as it will fail and may result in a bad flash which means your not gonna be playing any games without some major soldering.
I had never used a memory card before and couldn't get the copy option to show up until I figured out you need to select the game title first then press the D-pad to the right to enter the folder, now the copy option shows up.